As Cybersecurity Awareness Month 2023 continues, another seemingly simple but extremely effective way you can play your part to secure your data from cybersecurity attacks is through the use of Multi-Factor Authentication (MFA).
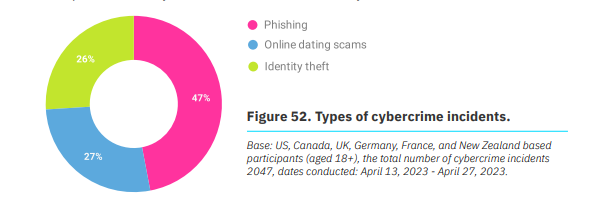
Studies from Microsoft and others have found that those who enable multi-factor authentication (MFA) on their accounts can prevent 99.9% of account-compromising attacks. This is vital because despite a 7% decrease in the number of cybercrime victims from last year, cybercrime remains a concern, according to the National Cybersecurity Alliance’s (NCA) Oh Behave: The Annual Cybersecurity Attitudes and Behaviors Report 2023. This year, 27% of people have been a victim of at least one type of cybersecurity attack.
To prevent and delay hackers from getting in and stealing your precious personal data, implementing MFA is a critical additional layer of security.
What is Multi-Factor Authentication?
For a primer on MFA and how to implement it in your Microsoft environment, check out this blog on the topic. But here’s a quick refresher:
We typically use usernames and passwords to access our accounts. However, passwords often leave many vulnerabilities exposed, so adding another verification method – MFA – is used by many services today.
Typically, this involves adding a second factor, such as a text message or an app-generated code, to the existing password. Once you have set up MFA, you will be prompted to enter the additional code or take a second step to verify your identity each time you log in to your account.
Using MFA will enable a more secure login attempt and help verify if the proper user is accessing their account. Furthermore, this will ensure that systems being accessed are from authorized users, which can help prevent insider threats and mitigate the risk of information going to the wrong person.
What Makes MFA Effective?
The importance of MFA in securing digital assets cannot be overstated. MFA offers stricter identity and access management protection that also helps businesses ensure regulatory compliance, protect confidential information, and reduce the chances of cybersecurity attacks within the organization.
All cybersecurity measures provide unique benefits to organizations, but what makes MFA effective is that it consists of a combination of two factors that are not easily duplicated:
- Something you know – These are your passwords or Personal Identification Numbers (PIN)
- Something you have – A smartphone or a secure USB key
- Something you are – Your fingerprint or facial recognition
This system helps prevent unauthorized access to sensitive information, even in the case of a data breach. If a hacker manages to steal one authentication factor, such as a password, they would still need to provide the MFA to gain access. This additional layer of security makes it much harder for cybercriminals to access sensitive data and can go a long way in protecting an organization’s digital assets.
Is MFA Widely Used Today?
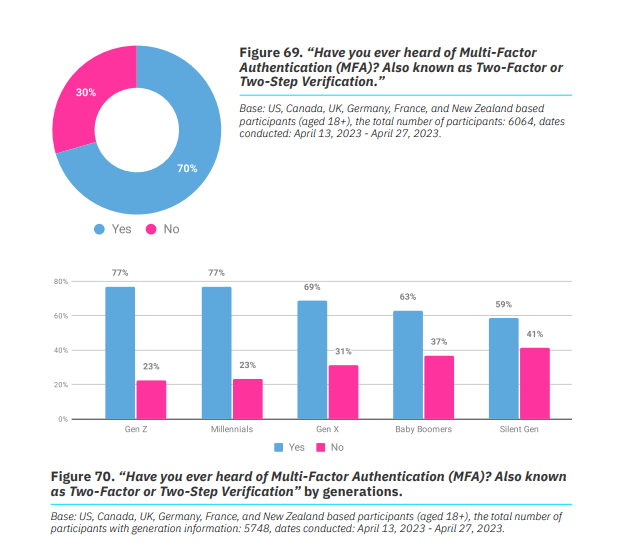
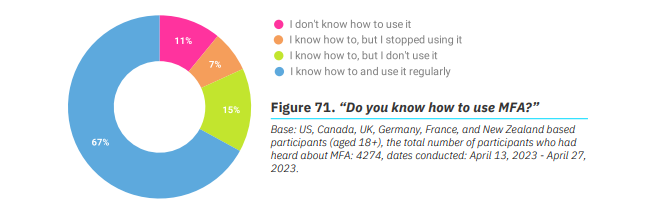
Despite significant changes in digital transformation efforts and cybersecurity threats, 30% of report respondents have never heard of multi-factor authentication. Similarly, in the US alone, 21% of those surveyed do not know about MFA.
More alarmingly, while a majority of people know about MFA, not everyone is actively using it to protect themselves. Among those who know how to use MFA but have stopped using it, 29% did so because it required them to bring their mobile phone all the time. Meanwhile, 19% find MFA burdensome, and another 19% have been regularly kicked out of their accounts due to MFA.
How to Implement MFA
To ensure that you effectively implement MFA protocols into your technology and processes, follow these best practices:
- Implement cybersecurity awareness training for employees. Considering the rate of people who are unfamiliar with MFA, it’s vital to reinstate the importance of MFA to your employees and provide knowledge on how to set up MFA. According to the 2023 report, 54% who underwent cybersecurity training learned how to use MFA and 34% started using MFA.
- Remember that the authentication method should not be too complicated for your organization’s employees. Making the process as simple as possible will help with your MFA adoption better. Weigh your options based on feedback from your workforce. For example, would they prefer a text-based MFA tool over app-based ones? Take this into account.
- Use a variety of authentication factors – such as security questions or SMS/text messages.
- Combine MFA with other security solutions such as single sign-on (SSO) and least privilege access.
- Conduct regular assessments to ensure your MFA technology continues to meet the needs of your users and the organization as a whole.
Solidify your Cybersecurity Framework with AvePoint
Cybersecurity measures should go beyond enabling MFAs. Learning about MFA tells us a lot about the importance of putting various security layers in an organization’s digital infrastructure. On top of MFA, it is vital to adopt other cybersecurity risk management practices that allow you to implement secure controls across your environment.
Backing up data is another fundamental factor in a cybersecurity framework. Not only does backing up your data reduce the risk of losing business-critical data, but backup solutions like AvePoint Cloud Backup also offer ransomware detection that enables you to see and act promptly against any risks in your Microsoft environment.
Another critical practice is installing software updates to ensure vulnerabilities are always addressed. With the fast-paced change in the digital world, closing any gap that cybercriminals might find in your environment is important to ensure that your workspaces remain secure against cyber risks.
AvePoint customers can also utilize Microsoft Entra ID (formerly Azure Active Directory) for authentication with our cloud solutions and Active Directory Federation Services for those using our self-hosted solutions.
By combining MFA with other cybersecurity measures, you can establish a robust security posture for your workspaces, proactively protecting your environment while allowing you to act promptly should any incidents happen.
To learn more about how we place safety at the heart of our customers and our people, visit the AvePoint Trust Center.