

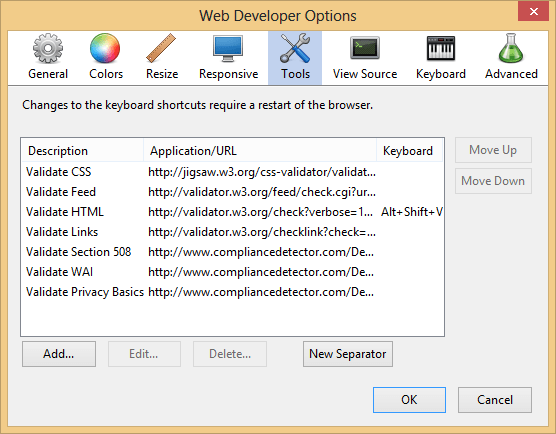
 Figure 1 - Edit or Add Options 3. Select either the [Edit] or [Add] Option, whatever is required, and then add two required values.
 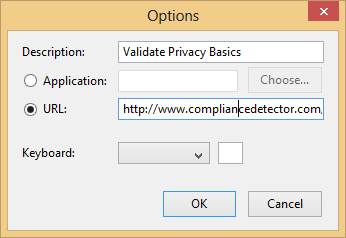 Figure 2 - Edit Privacy Basics Description and URL fields are needed for privacy validation – here are the requirements: A. In the Description Field, enter “Validate Privacy Basics”. B. In the URL Field, enter: http://www.compliancedetector.com/Details.aspx?tdf=2&target= (do not worry about the URL, as the Toolbar will append it to the URL completing “Target=”). 4. Select [OK] … and you are done! You can now select: Tools| Validate Privacy Basics from your Chrome or Firefox browser. You can do the same for Section 508 and WCAG 2.0 by repeating the aforementioned steps, but changing the two required values for A and B in Step Three as listed below. Section 508: A. In the Description Field, enter “Validate Section 508”. B. In the URL Field, enter: http://www.compliancedetector.com/Details.aspx?tdf=0&target= (do not worry about the URL, as the Toolbar will append it to the URL completing “Target=”). WCAG 2.0: A.In the Description Field put “Validate WAI WCAG 2.0” B. In the URL Field put: http://www.compliancedetector.com/Details.aspx?tdf=1&target= (do not worry about the URL, as the Toolbar will append it to the URL completing “Target=”). These simple steps will help you to better understand important quality factors for your website while using the Web Developer’s toolbar. For more information on how to use Compliance Detector, please read these blog posts on DocAve.com: How to use Compliance Detector and Privacy Basics and Compliance Detector.