There is always something happening in the world of Microsoft Teams. Recently at Microsoft Inspire, a new Teams client was announced. It will be using Edge Webview2 instead of Electron, making it faster, consume less memory, and make it possible to implement long-awaited features like multiple accounts. Meanwhile, Microsoft continues to release new features and improvements to Teams as-is, and in this blog post, I will walk you through four recent or upcoming updates you should know about!
1. Create a Task From a Message
For a long time now, people have requested the ability to create a task from a message in Teams. If you are familiar with Power Automate, you could accomplish this by building a flow and publishing it to all users in an organization. Now, however, this is a native feature in Microsoft Teams!
Click the ellipsis of any chat or channel message, then under “More actions” you will find the “Create task” option.

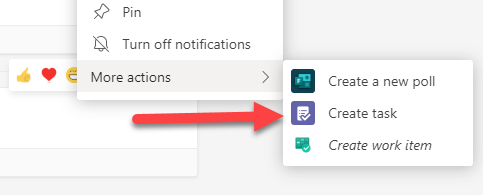
When clicked, a card will appear from where you create the task.

It will use the first sentence of the selected message as the name for the task, but this can be changed on the card itself. You can also set priority and a due date for the task.
You also need to determine where to create the task. By default, it will be created in your general “Tasks” list in Microsoft To-do.

You can change this by clicking the down-arrow on the right under “Create in” and selecting any other To-do list you have or any Planner plan you are a member of.
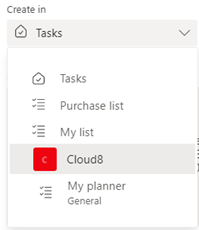
By selecting a Planner plan instead of a To-do list, you get more options like being able to select a bucket, set progress, and the ability to assign users to tasks.
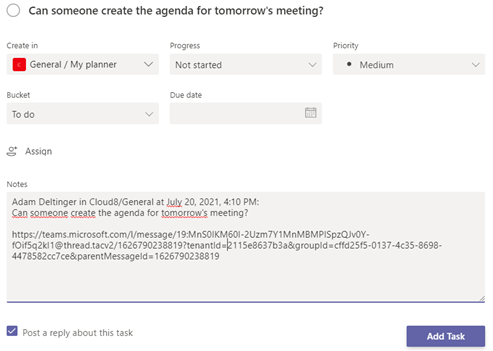
In the notes field, you will automatically populate information about where and when the task was created, along with all the text from the message itself. At the end, there is a direct link to the message in Teams. This text field is fully editable so you can remove or add to it.
Clicking “Add task” will create the task and, in my case, I chose to create it in my planner plan.
By going to the Tasks app in Teams I can now see the task.
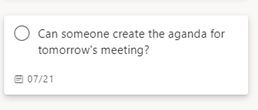
Feature Summary
Finally, you can create tasks from messages in Microsoft Teams. It works well, but it would be nice to have the option be more visible and easy to reach. As of now, it’s somewhat hidden, which also means some users won’t know about it until you show them (or have them read this blog post 😊).
2. Lock Meeting
Another new feature is the ability to “lock a meeting,” where is the ability to prohibit any user from joining that meeting after it has been locked.
In order to lock a meeting, you need to be part of it as well as the overall organizer.
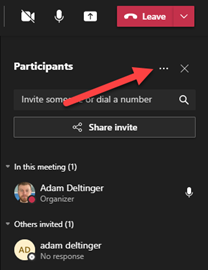
In the participants tab, click the ellipsis -> “Lock the meeting.”
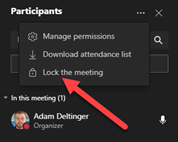
You need to confirm by clicking “Lock.”
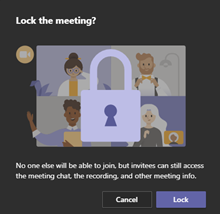
After you have confirmed, a disclaimer will pop up telling you that no one is permitted to join the meeting. You can also tell the meeting is locked by the small padlock in the upper left corner of the meeting window.

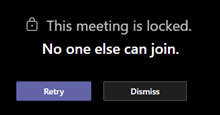
Be aware that no one—including invited users—can join the meeting once it’s locked. If someone tries to join, they will be prompted with the notice below.
Feature Summary
I think this is a good feature and a leap towards even more secure meetings. There have been several improvements regarding meeting control lately, like new lobby options and the ability to disable mics and cameras for attendees. The more options to control our Microsoft Teams meetings, the more useful it will be for our various meeting situations.
Mind you, this feature might not be useful for everyone. It should only be used when privacy is necessary and when you want to make sure no one else is joining a meeting. The lobby function is sufficient most times, but it does not prevent presenters from letting people in. When you want absolute awareness of attendees, the ability to lock a meeting is a welcome feature. Just make sure all expected attendees have joined before locking it!
3. Default File Opener for Microsoft Teams
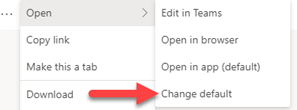
I welcome this soon-to-be-released setting with my arms open, and I know many others will too! Even if users have adopted to Teams, many prefer using the desktop applications to work with their Office documents. You have been able to do this before, of course, but with extra steps or by syncing the files locally and opening them from there. This setting lets you decide how Office files are opened by default when clicked on. No more clicking the ellipsis -> Open -> Open in app, like in the image below.

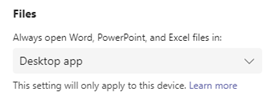
Users will be able to configure the default action by going to the “Files” section in Teams settings -> General.
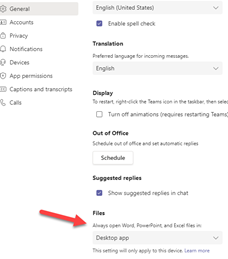
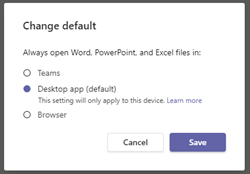
It is set to “Teams” by default but can be changed to “Browser” or “Desktop app.” The setting will be for that client (device) only, so you can have other default settings for your different devices.
You will also be able to change the setting by clicking the ellipsis next to a file -> Open -> Change default.
Feature Summary
It’s nothing revolutionary since you have had these options to open Office files before, but it is a great time saver not having to manually select your preferred way to open every file each time. Every user can set it personally, but it would be nice to be able to set a default value for all users from an administrative level as well.
4. Record a Meeting Automatically
A big ask has been to auto-start Microsoft Teams meeting recordings. That ask has now been answered with the new meeting option “Record automatically.” This is not a policy setting but rather just a meeting option any organizer must set for each meeting. It can be found among the other meeting options accessible from the meeting in Outlook in the meeting details in Microsoft Teams or from within the meeting itself.

When changing this setting to “Yes,” the meeting will start the recording as soon as the first internal attendee joins the meeting. As you might know, users outside your organization can never start a recording so the attendee triggering the recording must be from your organization.
The recording will be saved to the OneDrive of the first joined attendee or in SharePoint for channel meetings, meaning recording storage must have been switched from being stored in Stream. Also, the meeting policy for any user joining the meeting first must allow for recording. The meeting organizer will always have edit permissions for the recording even if it’s stored in someone else’s OneDrive.
After being first to join a meeting with the automatic recording option set to “Yes” the meeting recording starts after a few seconds and shows this disclaimer:
![]()
Feature Summary
This setting is great if you want to make sure no one forgets to start the recording. This has happened to me a few times and could have been mitigated by enabling this setting beforehand. In the scenario where the organizer is not even attending the meeting, it helps by taking the burden off of someone else to start the recording. It would be good to see this included in the meeting policy as well so no manual action is needed (even though I doubt most users want to record all their meetings in the first place).
I would also prefer if the recording were stored in the organizer’s OneDrive when this setting is enabled. In a way, the organizer is the initiator by enabling the auto-recording option and, by doing so, they should have full control over the recording. I have heard some rumors that Microsoft is looking into this.
Conclusion
Keeping up with updates and new features in Microsoft Teams is hard. There’s always something new happening (which is a good thing) but it also makes it very difficult for users to keep up with them, which results in missed opportunities to work more efficiently and productively. It’s important that organizations never stop educating and informing users about changes and new features. What was Microsoft Teams yesterday, is not the same as it is tomorrow.
Welcome to the world of cloud services!

