

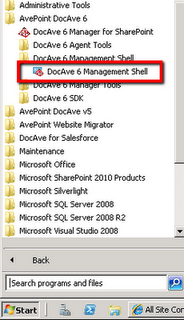
This link runs a shell window. The SharePoint extension is not loaded automatically, however: This was not meant to catch up with a simple command.
Add-PSSnapin Microsoft.SharePoint.PowerShell
Step 1 – Login To work with the DocAve API, it is necessary to connect to the DocAve Control Service. This is to ensure that no unauthorized person, or process, can send to DocAve. There are three ways to login: 1. Interactive via a login screen:Login-DocAveManager -ControlHost demo -ControlPort 14000
2. Transfer password as a SecureString$pwd = ConvertTo-SecureString -String "admin" -AsPlainText -forceLogin-DocAveManager -ControlHost demo -ControlPort 14000 -Username admin -password $pwd
3. Transfer as plain textLogin-DocAveManager -ControlHost demo -Control Port 14000 -Username admin -Password admin -plaintext
Step 2 – The Plan DocAve has a backup plan object, which can be created as well. It can either be an existing plan or a blank plan template. Existing Plan: $backupPlan = Get-DocAveGranularBackupBlankPlan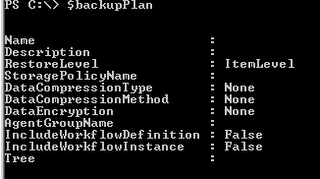
Blank Plan Template:
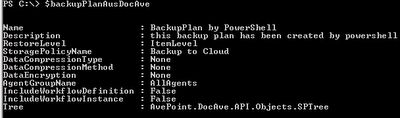
$backupPlan = Get-DocAveGranularBackupPlan -Name "Backup Plan by PowerShell"
Now, it’s possible to change the attributes of the backup plan or set.
Please Note: It is extremely important at this point that all attributes are set before you add onto the Tree.IncludeSPObject
The set of attributes works very simply, via direct access to the attribute name.
$BackupPlan.Name = "backup plan by PowerShell" $BackupPlan.Description = "this backup plan has been created by powershell"
$BackupPlan.StoragePolicyName = "Backup to Cloud"
$BackupPlan.AgentGroupName = "AllAgents"
The bits are the way to restore levels as follows:
Item Level 1 = 2 = Site Level 4 = Site Collection level
The plan now must describe what to include in the backup. This requires the production of a SPObject, which can be:
· SPList list = Library
· SPSite site = collection
· SPWeb site = sub
· SPWebApplication = Web Application
An example to secure a site collection is as follows:
$sourceObject = New-Object AvePoint.DocAve.API.Objects.SPSite "farm (DEMOSHAREPOINT:DEMO_SHAREPOINT_CONFIG)", "http://demo/docave/"
For a library, it looks like this:
$sourceObject = New-Object AvePoint.DocAve.API.Objects.SPList ("Farm (DEMOSHAREPOINT:DEMO_SHAREPOINT_CONFIG)","http://demo:80/docave/prototype/","/DocAve/per prototypes","standard library")Now, what parameters must be used in order to find the API documentation in the installation directory of DocAve?
Having defined what should be preserved, we need to pass the object to the plan.
$backupPlan.Tree.IncludeSPObject($sourceObject)
Here, you can easily add additional sources by renewed calls to the appropriate object.
The configuration of the plan you can control can be displayed again, as below:
New-DocAveGranularBackupPlan -Plan $backupPlan
In DocAve 6, it looks like this: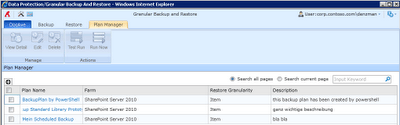
If you have loaded an existing plan from the plan in the DocAve object, you can perform an update of the existing plan in DocAve using Update:
Update-DocAveGranularBackupPlan -Plan $backupPlan
Step 4 – Showtime
Now, it’s time for the backup plan to start in DocAve via PowerShell.
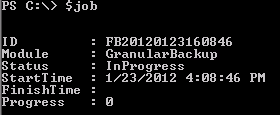
To let a job object in DocAve return, we can run a command to continue using the ID later.
$job = Run-DocAveGranularBackupJob -PlanName "backup plan by PowerShell" -BackupJobType full -JobReportType detailed
Run-DocAveGranularBackupJob -PlanName $newPlan.Name -BackupJobType full -JobReportType detailed -WaitForJobComplete
To bring the job status to experience, this code provides us with the DocAve status: Get-DocAveJob -ID $job.ID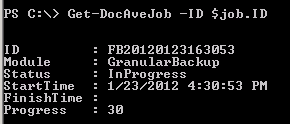
Step 5 – What is happening?
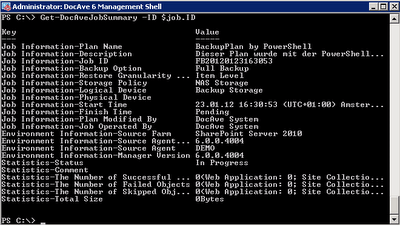
If our backup is finished, we can check the status.
Get-DocAveJobSummary -ID $job.ID
Remove-DocAveGranularBackupPlan -Name "backup plan by PowerShell"
In Conclusion: Working with the DocAve 6 PowerShell API is fun, and I’m looking forward to the next service pack, which will probably offer APIs for administration interfaces, content management, and BLOB retrieval. Please create a dummy document and put themselves in the same directory as the script. Thanks to Thorsten Hans for his tips on creating a subsite with PowerShell. PowerShell Script Download