

Learn about the hand SharePoint Online has in ensuring Microsoft 365 collaboration success with our recent on-demand webinar!
In my last blog post, I wrote about designing your SharePoint Sites to get the best User Experience and satisfaction possible. As my recommendation was to use as many visuals as possible to make your SharePoint Site look great, I’ll now explain how to get the best performance and site load time out of your SharePoint Online Site pages.
CDNs (an abbreviation for Content Delivery Networks) host static assets like Scripts, CSS, and pictures to provide better performance for your Sites as close as possible to the clients requesting them. These CDNs reduce latency and make downloads of these assets much quicker.
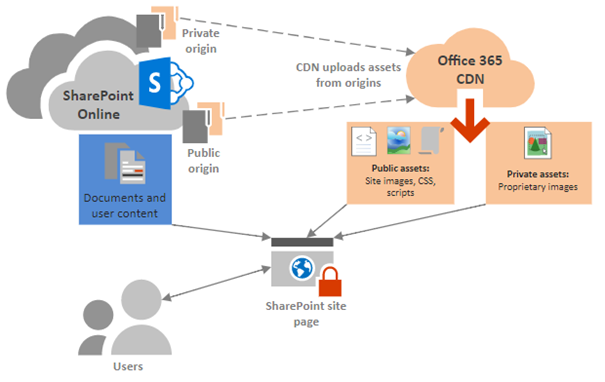
On the left-hand side of the infographic below, you can see where documents and user contents are stored. On the right side, you can see the public assets (all assets loaded from Office 365 and publishing pages each time you open a SharePoint Site) and private assets (all Images that come from your SharePoint Site-specific asset folders).
How to Analyze Your Page Performance & Which Items are Not in CDN
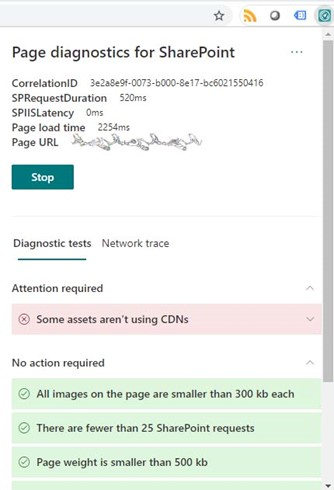
You can use the Page Diagnostics for SharePoint Tool—an extension in the new Microsoft Edge and Chrome browsers—to analyze your website speed and content. After installing this tool, browse your SharePoint Site and press the start button to explore your website performance data.
In the following screenshot of my analytics, you can see some assets which aren´t using CDNs.
How to Improve Site Load Performance with CDNs
First of all, check if the CDNs are active in your Tenant. You can check this configuration with the SharePoint Online Management Shell:
- Connect to Your SharePoint Online Tenant
Connect-SPOService -Url https://<YourTenantName>-admin.sharepoint.com
- Check if Private & Public CDN is enabled
Get-SPOTenantCdnEnabled -CdnType Private
Get-SPOTenantCdnEnabled -CdnType Public
- To enable Private & Public CDNs, execute the following command:
Set-SPOTenantCdnEnabled -CdnType Both -Enable $true
The Output should look like this:

- To enable more Paths in your CDN settings, you can use the following Commands:
For all Public assets such as Javascript or CSS Files, which will be loaded for all users, use the Public CDN Type:
Add-SPOTenantCdnOrigin -CdnType Public -OriginUrl */PATHTOYOURASSETFOLDER
For all other private assets like pictures on websites or in news posts, use the Private CDN type like this:
Add-SPOTenantCdnOrigin -CdnType Private-OriginUrl */PATHTOYOURASSETFOLDER
After enabling the CDN Configuration in your tenant, the next time you use the page diagnostics for SharePoint Extension it should look like this:

What happens after enabling CDNs in your Tenant?
After CDNs are enabled, SharePoint Online assets are automatically cached and rewritten by the public or private CDN URL. If you browse a SharePoint Site, all assets in the Origin Folders (for example, “*/Style Library/”) are rewritten to the nearest CDN and now loading much faster than in the original path because of the lower latency to the content.
Following a Flow diagram precisely shows how the CDN works:

In Summary
Always try to check your pages with the Page Diagnostics for SharePoint Tool. Then activate CDNs in your tenant, especially if you use visualizations, JavaScript, or CSS Files, but keep in mind that the content might need some time to be cached. Afterwards you can of re-check your site again and enjoy faster load times


