

In October 2020, Microsoft reported that Microsoft Teams has around 115 million daily active users. It has been a great collaboration platform, especially since most of the workforce has transitioned to a work from home setup. From exchanging messages through chats to doing online meetings through video conferencing and sharing documents and files within the team, Microsoft Teams has been an easy-to-use and effective tool. However, it can do so much more beyond these basic communication features.
Through the use of Power Platform, you can maximize the use of Microsoft Teams, making your day-to-day tasks faster and easier. This might sound hard to achieve but automating your process through Power Platform apps is very easy and can be done by any user. There is a bunch of ready app templates that you can use and no need for hard coding do setup your process. These apps can also be available in Microsoft Teams mobile, making it more accessible to your users. So, in this blog, let’s see some simple automations that you can try to create for your users, customers or employees.
Create Virtual Agents (Chatbots)
There are some everyday tasks that are needed to be done manually and take a lot of steps to be completed, such as asking a simple inquiry to HR, submitting requests and approvals, or reporting a ticket to the IT Helpdesk. All these repeating tasks could be automated through Power Virtual Agents. If you’re an admin of a team and want to create chatbots to respond to common questions asked by your employees or teammates, this feature is for you. Here’s how you can create a virtual agent for your team or organization.
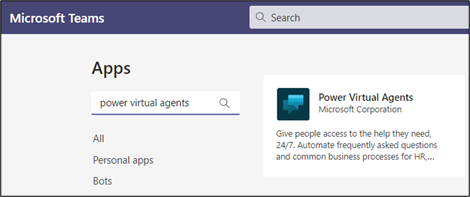
1. The first thing you need to do is to add the Power Virtual Agents app in Microsoft Teams. To proceed, select Apps at the bottom of the navigation pane in Microsoft Teams:

2. In the search box, type power virtual agents and then select the tile that appears. Select Add for me in the description window that pops up. This adds the app to the navigation panel on the left side, and you can pin the new app for easy navigation:
After adding the Power Virtual Agents app, you can now start creating your chatbot. Chatbots need to go to a Team and every member in that Team will be able to use it. If you want other people to use the chatbot, you need to add them to the Team where you created the virtual agent.
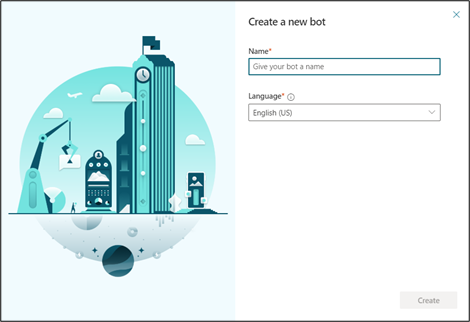
- To create the chatbot, open the newly added Power Virtual Agents App. Afterwards, you can choose the Team you want to put the chatbot on. Then, select Create to start building your bot. This process may take a while especially if it’s your first time setting up. After the process has been completed, you can name your chatbot and hit Create button to complete the process.
Now that you have created the app in your team, it’s now time to define its logical flow and how to respond to the inquiry of your users. In Power Virtual Agents, the chatbot will answer the questions asked by the users depending on the topic. You can create topics by customizing the provided templates.
1. To create topics, go to the Topics tab from the navigation bar:
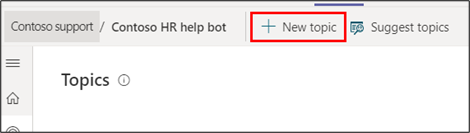
2. Select New topic:
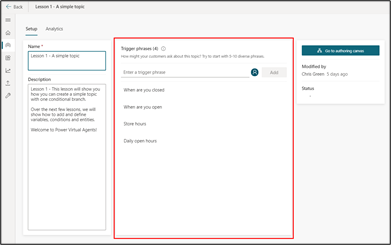
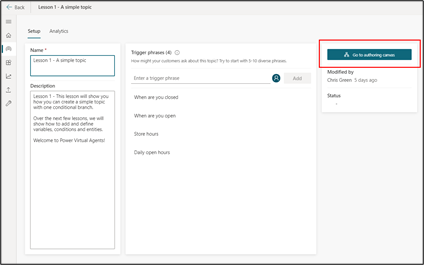
3. Define the name, description, and trigger phrases for that topic. The trigger phrase can be your users’ starting question. You may use short sentences and keywords related to the topic. It’s not necessary to come up with too many trigger phrases since the bot can determine what the user is asking and match it to a related topic. Afterwards, you can save this topic and proceed to create another one.
- Once the topics are set, it’s now time to automate the process. You can define the flow of the conversation or define the automated answer for your topics. Go to the topics you created and hit Go to authoring canvass:
- The authoring canvas is where you can define the conversation flow for your topic. There might be nodes automatically created that you need to edit, or you may have to add a new node by clicking on the plus (+) sign. Here are the five options you can choose to define the conversation path for the bot to answer your topics:
Ask a question – You can let your users ask questions. It’s either a multiple-choice question or a field where they can type in their inquiry.
Add a condition – You can add branching logic based on variables. Variables let you save responses from your customers in a conversation with your bot so that you can reuse them later in the conversation, such as a user’s name for a variable called UserName.
Call an action – This function is used with Power Automate Flows integration.
Show a message – you can respond to the user’s question with a plain message. There is an available basic font formatting such as bold, italics, and numbering.
End with a survey – At the end of the conversation, you can let the user answer a survey. The responses will be collected and added to the Customer Satisfaction Analytics page.

After setting everything up, you may preview and test your bot to see if everything is working as expected and to make changes if needed. Once ensured that the bot is working fine, it’s now time to publish it for your users to take advantage of.
In our digital age now, it’s best to automate processes that require many steps before completion. Leveraging bots that will answer the common and oft-repeated inquiries from your users will add up to better productivity and efficiency for the whole organization.


